When I make a linked input channel group, can I set an offset in level?
With M7CL, no, you can't keep an offset on the faders, but you could use the Attenuator to keep a level offset between the channels. Keep in mind that the Attenuator is part of the EQ parameters. In this case, you should not link the EQ on those channels. EQ should be disengaged within the Channel Link Mode window.
On the other hand, LS9 can keep offset on the faders. (Owner's Manual p.125)
"You can temporarily exclude a channel from link groups in order to adjust parameters that maintain their level balance while linked, such as when you want to adjust the level balance between channels in a link group. Hold down the [SEL] key of the channel whose balance you want to adjust, and edit the desired parameter. HA GAIN and fader will not be linked while you are holding down the [SEL] key. (However, this function will not work during the fade of a scene memory recall operation.)"
Monday, March 31, 2008
Friday, March 28, 2008
AUTO STORE
What is "AUTO STORE" function?
(for PM1D and PM5D users)
The Auto-store function enables you to press the "STORE" button twice and directly store the information into the scene you are working on. If the key is depressed only once you will not store information into the scene you are currently working on.
(Find this option in PM5D PREFERENCE1 screen, or PM1D PREFERENCE screen)
Note 1 (PM5DV2 Owner's Manual, p.91)
"Note that if the STORE CONFIRMATION button is turned on in the STORE/RECALL area of this PREFERENCE 1 screen, a window will ask you to confirm the Store operation even if Auto Store is enabled. If you don’t want any windows to appear, turn off the STORE CONFIRMATION button as well."
Note 2 (M7CL Owner's Manual, p.126)
"You have the option of making settings so that the Store Confirmation dialog box does not appear (→ p. 198). In this case, pressing the SCENE MEMORY [STORE] key once will display the SCENE STORE popup window as usual, and pressing it once again will execute the Store operation.
Alternatively, you can rapidly press the SCENE MEMORY [STORE] key twice to store without seeing the SCENE STORE popup window."
M7CL doesn't have Library linked to a Scene Memory and it doesn't need the "AUTO STORE" option. LS9 doesn't have [STORE] key on the panel, but when you assign the Store function to one of the User Defined Keys, the key behaves in the same way as the M7CL STORE key does.
Thursday, March 27, 2008
DCA MUTE
How does "DCA MUTE" work?
When you choose to use the DCA mute, it is similar to bringing the DCA fader down. What that means is that only the Post Fader sends on those channels assigned to that DCA group will be affected, not the Pre-Fader sends.
Using the Mute groups, however, will affect all the sends from the channels assigned to that Mute group--Pre Fader and Post Fader. This turns the channels off.
PM5DV2 has an unique option for the DCA MUTE function, which can be found in the PREFERENCE1 screen.
DCA MUTE TARGET (Owner's Manual p.205)
This specifies whether the DCA [MUTE] key will mute the send to the MIX bus when the send-source to the MIX bus is PRE FADER. If you specify “POST ONLY,” the PRE FADER signal will not be muted. If you specify “PRE & POST,” it will be muted regardless of the send-source position.
Wednesday, March 26, 2008
Short-cut (PM5DV2 Editor)
Shortcut techniques for the editor software.
Most of the short-cut are common between the other Editor programs.

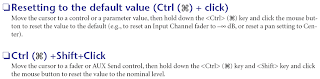
Set Nominal/Set Default
Ctrl+Click or Ctrl+Shift+Click is very useful. It can be used even for flattening one frequency band in a PEQ.
Channel Copy (Ctrl+C)/Paste (Ctrl+V)
DM/0 series, PM5D v2, and DSP5D editor has the function.
Undo (Ctrl+Z)/Redo (Ctrl+Y)
It cannot undo operations on the console, but most of operations on the program can be undone and it is not only one level.
Mix ON/OFF from the overview (INPUT CH) window
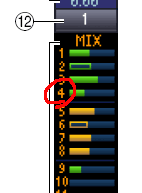 You can turn this on/off by clicking the number at the left.
You can also adjust the send levels by dragging a bar graph to left or right.
Open the Selected Channel window
You can doubleclick the channel number ((12) in the picture right) to open the Selected Channel window for this channel. If you hold down your computer keyboard’sCtrl key and double-click this, the Locked window will open.
Export Channel Name list to a file
Open the Patch Editor window and select the Patch List page.
By clicking the "EXPORT" button, input patch, output patch, and channel name data can be written to a CSV file.
You can print or edit the file with a spreadsheet program. You can load the edited file to the PM5D later.
(Please refer to the PM5DV2/DSP5D Editor Owner's Manual for more details.)
By the way, I added hardware short-cut info to the last post. Please check the post again.
Most of the short-cut are common between the other Editor programs.

Set Nominal/Set Default
Ctrl+Click or Ctrl+Shift+Click is very useful. It can be used even for flattening one frequency band in a PEQ.

Channel Copy (Ctrl+C)/Paste (Ctrl+V)
DM/0 series, PM5D v2, and DSP5D editor has the function.
Undo (Ctrl+Z)/Redo (Ctrl+Y)
It cannot undo operations on the console, but most of operations on the program can be undone and it is not only one level.
Mix ON/OFF from the overview (INPUT CH) window
 You can turn this on/off by clicking the number at the left.
You can also adjust the send levels by dragging a bar graph to left or right.
Open the Selected Channel window
You can doubleclick the channel number ((12) in the picture right) to open the Selected Channel window for this channel. If you hold down your computer keyboard’s
Export Channel Name list to a file
Open the Patch Editor window and select the Patch List page.
By clicking the "EXPORT" button, input patch, output patch, and channel name data can be written to a CSV file.
You can print or edit the file with a spreadsheet program. You can load the edited file to the PM5D later.
(Please refer to the PM5DV2/DSP5D Editor Owner's Manual for more details.)
By the way, I added hardware short-cut info to the last post. Please check the post again.
Tuesday, March 25, 2008
Short-cut (PM5D)
Here is a list of keyboard shortcut for PM5D with an external PS/2 keyboard. (PM5DV2 Owner's manual p.25)
Other short-cut techniques with the control surface which we are talking in our seminar are found in the "PM5D Short-Cut list".

(Following is added by Shaun, March 26th)
Back to a previous tab in the menu screen (Previous Tab function)
(1) Press and hold the Display Access key for the menu that you want to access for a moment or (2) just press the Display Access key that you want to access while holding the SHIFT key and that will take you back.
Back to the firs tab in the screen
Rapidly press the Display Access key twice.
Back to the screen that was used immediately prior to the current screen (Page Back function)
This function could be assigned to one of the User Define Keys for quick and easy access. User Define Keys will allow you to move in either direction--one assigned to move forward and one assigned to move backwards (just like your internet browser).
Note: if the page was displayed for less than two seconds, it was not memorized.
The following is a copy from the "PM5D Short-cut List" for your convenience.
Using the ‘SEL’ switches
1. CHANNEL PAIR
Hold ‘SEL’ for one channel and press ‘SEL’ for the adjacent channel to make a stereo pair. This works for input and output channels, so long as the left side is an odd number and the right side is an even number. The channel with the SEL switch you hold first is the master channel for the pair: its settings are copied to the other channel (except for pan and gain). Repeating this action breaks the stereo pair, to make the channels mono again.
NOTE: This pairing short-cut can be disabled in the PREFERENCE UTILITY.
2. MIX-MINUS
Hold the ‘SEL’ switch of a mix bus and press the ‘SEL’ switch of an input channel to make a Mix-Minus bus. Normally, a ‘JOB SELECT’ confirmation box will appear with an OK or CANCEL selection. When OK is pressed, the selected MIX bus will become a MIX-MINUS for the selected input channel. What actually happens is that all input channels are sent to the selected mix post fader (and post TO-STEREO) at 0dB except for the selected input channel, whose send level is set to –infinity. This is sometimes also called a ‘CLEAN-FEED’.
NOTE: The MIX encoders must be in MIX MASTER mode. The confirmation message can be disabled in the PREFERENCE UTILITY.
3. MATRIX SENDS
Hold down the ‘SEL’ switch of a MIX bus or STEREO Master to see all the Matrix Send levels on the MATRIX encoders. (The MIX encoders must be in MIX MASTER mode). The MATRIX channel SEL switches will flash during this time. Remember each time the ‘SEL’ switch for STEREO A or B is pressed, it swaps between the Left and Right channels, so the Left and Right send levels can be accessed separately. Alternatively, hold down the ‘SEL’ switch of a MATRIX channel to see the send levels from all the MIX buses to the selected MATRIX channel. All the MIX channel SEL switches will flash during this time.
NOTE: Alternatively, instead of holding the SEL switch, you can double-click it, to keep two hands free.
4. CHANNEL COPY
Select the source channel with its SEL switch, then press the CHANNEL COPY switch (in the SELECTED CHANNEL area). Then press the SEL switch of the destination channel and click PASTE. Finally, click OK in the dialog box on the LCD.
NOTE: The parameters which are copied are determined on the CH COPY page in the VIEW menu for the input and output channels.
5. AUTO SCROLL
When viewing a display such as PATCH or PAN/ROUTING, pressing a SEL key will scroll the display to highlight the selected channel.
Using the ‘SHIFT’ key
1. GEQ edit on faders
Hold SHIFT and press one of the FADER MODE [A-F] keys (above the DCA faders) to edit the GEQ bands on the faders. Each key [A-F] will access a different set of frequency bands.
NOTE: This function only works when the GEQ PARAM page is displayed on the LCD.
2. MIX Send Job Select
This enables the user to quickly set multiple Mix sends to the same level, or to switch multiple sends On/Off or Pre/Post. This function only works on the CH to MIX page and the MIX SEND VIEW page in the PAN/ROUTING menu. Highlight a parameter with the cursor. Then hold SHIFT and press ENTER. A JOB SELECT window will appear providing various copy options: to all Mixes or to all Channels or to all Mixes and Channels. This is very convenient when setting up many monitor mixes.
3. Scene FADE TIME
When setting the same Fade Time for multiple channels in a Scene, first set the time for one channel, then hold SHIFT and press ENTER. This will open a JOB SELECT window where various COPY options can be selected, such as “TIME COPY [ALL INPUT]”.
4. Fast movement of the DATA WHEEL
To quickly adjust a parameter with lots of steps, such as a delay time, hold SHIFT while turning the silver DATA WHEEL for coarse adjustment of the parameter. This also works for scrolling quickly through a long list, such as the SCENE MEMORY library.
5. PATCH Scrolling
Normally, turning the silver DATA WHEEL will scroll the cursor left/right through the PATCH field. To scroll up/down through the PATCH filed, hold SHIFT while turning the DATA WHEEL.
6. CURSOR movement
When there is a list or PATCH field, hold SHIFT and press a CURSOR key (up/down/left/right) to exit the list or field (or move to the adjacent field when there is one).
Keyboard Shortcuts
Other Tips
OK/CANCEL
To choose ‘OK’ or ‘CANCEL’ in a confirmation dialog box, simply press either “INC(OK)” or “DEC(CANCEL)” above the data entry wheel. The mouse or ENTER key is not needed in this case.
MIX CUE
To cue a MIX bus, double-click the relevant ENCODER MODE key on the left side of the console. Clicking once will select the MIX SENDS to be shown on the encoders (or on the faders in FADER FLIP mode), and clicking again will CUE the same MIX.
NOTE: This function can be disabled in the CUE/SOLO page of the MON/CUE menu.
CUE CLEAR
Pressing the LAST CUE switch in the CUE section of the console will cancel all Cued channels. It also changes the cue mode from LAST CUE to MIX CUE. So pressing this switch twice will cancel all Cued channels and keep the same CUE mode.
Effect Tap Tempo
Effect Tap Tempo can be assigned to USER DEFINED keys. Tap Tempo will work for any effect with a NOTE parameter. The NOTE parameters should be set to ‘Quarter Note’ or ‘Crotchet’ for Tap Tempo to work as expected.
Drag’n’Drop Copy
Some functions can be easily copied from one channel to another by the familiar Drag’n’Drop method. This works for channel EQ, Gate and Comp, Effects and GEQs. On an overview window where multiple EQ graphs can be seen, for example, click on one graph then drag it and drop it onto another one (using the mouse or track-pad) to copy the EQ settings. To copy to a channel on another page (for example copying from channel 1 to channel 25), first drag the graph onto the menu tab of the relevant page, then locate the desired destination channel.
BOOKMARK (USER DEFINE)
This can be useful to quickly access a frequently used menu page.
First assign the BOOKMARK function to one or more USER DEFINED keys. Then view the desired menu page. Then hold the USER DEFINED button for 2 seconds until it lights up. Now, every time that button is pressed, it will quickly access the assigned page.
LAYER SNAPSHOT (USER DEFINE)
This will memorise the layer settings for the input channel faders, MIX encoders, ENCODER MODE, DCA faders and METERS. First assign LAYER SNAPSHOT to a USER DEFINED key, then configure all the layers in the desired way, and hold the USER DEFINED key for 2 seconds until it lights up. Now every time that button is pressed, it returns the layers to the chosen configuration.
CUE Level on a Fader
(Shaun: with PM5DV2, you can assign Monitor/Cue Level to Stereo A/B Fader in FADER MODE screen.)
Some stage monitor engineers like to have fader control of their Cue listening level. Here is a way to configure this on PM5D:
1. In the OUTPUT INSERT PATCH menu, patch MONITOR L and MONITOR R to a spare FX IN connection (INSERT OUTPUT grid).
2. Then in the INSERT INPUT grid on the right side of the page, patch ST AL and ST AR to the same FX OUT connection.
3. If all FX are in use, then an alternative is to use a digital 2TR OUT and IN connection, and use a cable to loop them together on the rear panel.
4. Switch on the INSERT for ST A, and check the INSERT POINT is PRE FADER (in the INSERT POINT page of the OUTPUT PATCH menu).
5. Connect the wedge amp or in-ear pack to the ST A output connection, and use the fader to adjust the listening level.
NOTE: Do not cue the ST A channel, or a feedback loop will be created.
SCENE STORE
Here are some useful tips for Scene Storing:
1. To speed up the Scene Store process, disable the STORE CONFIRMATION in the PREFERENCE 1 page of the UTILITY menu.
2. To speed up the Scene Store process even more, enable AUTO STORE in the same Preference page. This means a scene can quickly be stored just by double-clicking the STORE switch on the console. This is useful when updating scenes many times.
3. When storing a Scene, the PATCH and HA LIBRARY data are also stored automatically if a change has been made. In the SCENE STORE window (which appears when the SCENE STORE switch is pressed), there is a choice to OVERWRITE the current libraries (useful when only one PATCH and HA setting is needed for a whole show), or to make NEW libraries (useful when different settings are needed for each Scene in the show).
NOTE: Input Channel names are stored in the INPUT PATCH Library, with Input Patch, Direct Out Patch and Input Channel Insert Patch data.
DCA names are stored in the SCENE Memories.
+48V and GAIN (for PM5D-RH) are stored in the HA library, with settings from remote AD824 and AD8HR input units.
Import Scenes from PCMCIA Card
This is a useful tip for engineers at a festival, to take just one scene from a memory card and load it into the console without overwriting existing data:
1. If the scenes were originally stored to the card using ADVANCED MODE, then they can be loaded into the console also using ADVANCED MODE. When ADVANCED MODE is used, the Scene numbers can be changed, to make sure they don’t overwrite anything already in the console. The same can be done for PATCH and HA Libraries.
2. If the data was stored in BASIC MODE (the default method), then PM5D EDITOR and STUDIO MANAGER software will be needed. Use the following steps:
3. Load the .PM5 file into PM5D EDITOR (select CONSOLE FILE as the file type when browsing in the OPEN SESSION window).
4. Open the Scene Memory window (press Ctrl+Alt+3).
5. Drag the required scene from the right column to the desired number in the left column, and click SAVE AS…
6. Save this scene as a Console File (.PM5) onto the PCMCIA card.
7. Repeat steps 5 and 6 for the relevant PATCH and HA libraries in the LIBRARY window (Ctrl+4) if they are also needed. Then there will be one file for the scene and one for each library on the card.
8. Put the card into the console, select the SCENE MEMORY File that was just saved, and select ADVANCED MODE on the LOAD page in the UTILITY menu.
9. Choose the correct scene as the SOURCE (remember to adjust the ‘from’ and ‘to’ numbers so that other scenes are not overwritten), and choose a free space as the DESTINATION. Then LOAD the file into the console.
10. Repeat steps 8 and 9 for loading the PATCH and HA library files if required.
11. Check the correct libraries are linked to the imported scene in the SCENE page of the SCENE menu.
Initialize Memories
To erase all the memories in the console and return it to its initial settings, first switch off the console. Then switch it on again while holding the SCENE STORE switch. An INITIALIZE MENU will then appear. Choose INITIALIZE ALL MEMORIES to erase all the libraries and return to the default settings. INITIALIZE CURRENT MEMORIES will return the console to the default settings without erasing the libraries.
Other short-cut techniques with the control surface which we are talking in our seminar are found in the "PM5D Short-Cut list".


(Following is added by Shaun, March 26th)
Back to a previous tab in the menu screen (Previous Tab function)
(1) Press and hold the Display Access key for the menu that you want to access for a moment or (2) just press the Display Access key that you want to access while holding the SHIFT key and that will take you back.
Back to the firs tab in the screen
Rapidly press the Display Access key twice.
Back to the screen that was used immediately prior to the current screen (Page Back function)
This function could be assigned to one of the User Define Keys for quick and easy access. User Define Keys will allow you to move in either direction--one assigned to move forward and one assigned to move backwards (just like your internet browser).
Note: if the page was displayed for less than two seconds, it was not memorized.
The following is a copy from the "PM5D Short-cut List" for your convenience.
PM5D Short-Cut List
Using the ‘SEL’ switches
1. CHANNEL PAIR
Hold ‘SEL’ for one channel and press ‘SEL’ for the adjacent channel to make a stereo pair. This works for input and output channels, so long as the left side is an odd number and the right side is an even number. The channel with the SEL switch you hold first is the master channel for the pair: its settings are copied to the other channel (except for pan and gain). Repeating this action breaks the stereo pair, to make the channels mono again.
NOTE: This pairing short-cut can be disabled in the PREFERENCE UTILITY.
2. MIX-MINUS
Hold the ‘SEL’ switch of a mix bus and press the ‘SEL’ switch of an input channel to make a Mix-Minus bus. Normally, a ‘JOB SELECT’ confirmation box will appear with an OK or CANCEL selection. When OK is pressed, the selected MIX bus will become a MIX-MINUS for the selected input channel. What actually happens is that all input channels are sent to the selected mix post fader (and post TO-STEREO) at 0dB except for the selected input channel, whose send level is set to –infinity. This is sometimes also called a ‘CLEAN-FEED’.
NOTE: The MIX encoders must be in MIX MASTER mode. The confirmation message can be disabled in the PREFERENCE UTILITY.
3. MATRIX SENDS
Hold down the ‘SEL’ switch of a MIX bus or STEREO Master to see all the Matrix Send levels on the MATRIX encoders. (The MIX encoders must be in MIX MASTER mode). The MATRIX channel SEL switches will flash during this time. Remember each time the ‘SEL’ switch for STEREO A or B is pressed, it swaps between the Left and Right channels, so the Left and Right send levels can be accessed separately. Alternatively, hold down the ‘SEL’ switch of a MATRIX channel to see the send levels from all the MIX buses to the selected MATRIX channel. All the MIX channel SEL switches will flash during this time.
NOTE: Alternatively, instead of holding the SEL switch, you can double-click it, to keep two hands free.
4. CHANNEL COPY
Select the source channel with its SEL switch, then press the CHANNEL COPY switch (in the SELECTED CHANNEL area). Then press the SEL switch of the destination channel and click PASTE. Finally, click OK in the dialog box on the LCD.
NOTE: The parameters which are copied are determined on the CH COPY page in the VIEW menu for the input and output channels.
5. AUTO SCROLL
When viewing a display such as PATCH or PAN/ROUTING, pressing a SEL key will scroll the display to highlight the selected channel.
Using the ‘SHIFT’ key
1. GEQ edit on faders
Hold SHIFT and press one of the FADER MODE [A-F] keys (above the DCA faders) to edit the GEQ bands on the faders. Each key [A-F] will access a different set of frequency bands.
NOTE: This function only works when the GEQ PARAM page is displayed on the LCD.
TIP
1. Use the AUTO ASSIGN switch on the GEQ PARAM page to automatically assign fader control when this page is displayed.
2. To view a GEQ inserted on a different channel, just press the SEL switch for that channel (so long as the GEQ PARAM page is already displayed).
2. MIX Send Job Select
This enables the user to quickly set multiple Mix sends to the same level, or to switch multiple sends On/Off or Pre/Post. This function only works on the CH to MIX page and the MIX SEND VIEW page in the PAN/ROUTING menu. Highlight a parameter with the cursor. Then hold SHIFT and press ENTER. A JOB SELECT window will appear providing various copy options: to all Mixes or to all Channels or to all Mixes and Channels. This is very convenient when setting up many monitor mixes.
3. Scene FADE TIME
When setting the same Fade Time for multiple channels in a Scene, first set the time for one channel, then hold SHIFT and press ENTER. This will open a JOB SELECT window where various COPY options can be selected, such as “TIME COPY [ALL INPUT]”.
4. Fast movement of the DATA WHEEL
To quickly adjust a parameter with lots of steps, such as a delay time, hold SHIFT while turning the silver DATA WHEEL for coarse adjustment of the parameter. This also works for scrolling quickly through a long list, such as the SCENE MEMORY library.
5. PATCH Scrolling
Normally, turning the silver DATA WHEEL will scroll the cursor left/right through the PATCH field. To scroll up/down through the PATCH filed, hold SHIFT while turning the DATA WHEEL.
6. CURSOR movement
When there is a list or PATCH field, hold SHIFT and press a CURSOR key (up/down/left/right) to exit the list or field (or move to the adjacent field when there is one).
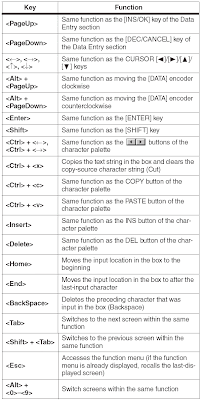
Keyboard Shortcuts
Esc Function MenuWith NUM LOCK on the keyboard
Tab Next Page in the Menu
Shift+Tab Previous Page in the Menu
Cursor Keys same as cursor keys on console
Enter same as ENTER on console
Page Up increase a parameter by one step (same as INC key),
Choose ‘OK’ in a confirmation dialog box.
Page Down decrease a parameter by one step (same as DEC key),
Choose ‘CANCEL’ in a confirmation dialog box.
Ctrl+Alt+Esc Show Message History (Messages on the LCD).
1-9,0 Use the numbers to type in a scene number
Enter Scene Recall
+ Next Scene select
- Previous Scene select
Other Tips
OK/CANCEL
To choose ‘OK’ or ‘CANCEL’ in a confirmation dialog box, simply press either “INC(OK)” or “DEC(CANCEL)” above the data entry wheel. The mouse or ENTER key is not needed in this case.
MIX CUE
To cue a MIX bus, double-click the relevant ENCODER MODE key on the left side of the console. Clicking once will select the MIX SENDS to be shown on the encoders (or on the faders in FADER FLIP mode), and clicking again will CUE the same MIX.
NOTE: This function can be disabled in the CUE/SOLO page of the MON/CUE menu.
CUE CLEAR
Pressing the LAST CUE switch in the CUE section of the console will cancel all Cued channels. It also changes the cue mode from LAST CUE to MIX CUE. So pressing this switch twice will cancel all Cued channels and keep the same CUE mode.
Effect Tap Tempo
Effect Tap Tempo can be assigned to USER DEFINED keys. Tap Tempo will work for any effect with a NOTE parameter. The NOTE parameters should be set to ‘Quarter Note’ or ‘Crotchet’ for Tap Tempo to work as expected.
TIP
If a footswitch is required for Tap Tempo, first assign the USER DEFINED key, then assign a GPI IN to that key, and connect the footswitch to the correct GPI port.
Drag’n’Drop Copy
Some functions can be easily copied from one channel to another by the familiar Drag’n’Drop method. This works for channel EQ, Gate and Comp, Effects and GEQs. On an overview window where multiple EQ graphs can be seen, for example, click on one graph then drag it and drop it onto another one (using the mouse or track-pad) to copy the EQ settings. To copy to a channel on another page (for example copying from channel 1 to channel 25), first drag the graph onto the menu tab of the relevant page, then locate the desired destination channel.
BOOKMARK (USER DEFINE)
This can be useful to quickly access a frequently used menu page.
First assign the BOOKMARK function to one or more USER DEFINED keys. Then view the desired menu page. Then hold the USER DEFINED button for 2 seconds until it lights up. Now, every time that button is pressed, it will quickly access the assigned page.
TIP
This is useful to quickly access different GEQs or EFFECTS.
LAYER SNAPSHOT (USER DEFINE)
This will memorise the layer settings for the input channel faders, MIX encoders, ENCODER MODE, DCA faders and METERS. First assign LAYER SNAPSHOT to a USER DEFINED key, then configure all the layers in the desired way, and hold the USER DEFINED key for 2 seconds until it lights up. Now every time that button is pressed, it returns the layers to the chosen configuration.
CUE Level on a Fader
(Shaun: with PM5DV2, you can assign Monitor/Cue Level to Stereo A/B Fader in FADER MODE screen.)
Some stage monitor engineers like to have fader control of their Cue listening level. Here is a way to configure this on PM5D:
1. In the OUTPUT INSERT PATCH menu, patch MONITOR L and MONITOR R to a spare FX IN connection (INSERT OUTPUT grid).
2. Then in the INSERT INPUT grid on the right side of the page, patch ST AL and ST AR to the same FX OUT connection.
3. If all FX are in use, then an alternative is to use a digital 2TR OUT and IN connection, and use a cable to loop them together on the rear panel.
4. Switch on the INSERT for ST A, and check the INSERT POINT is PRE FADER (in the INSERT POINT page of the OUTPUT PATCH menu).
5. Connect the wedge amp or in-ear pack to the ST A output connection, and use the fader to adjust the listening level.
NOTE: Do not cue the ST A channel, or a feedback loop will be created.
TIP
The CUE output could be connected to a 2-TRACK ANALOG input, and patched to the STEREO B channel for fader control, so one fader could be used for a wedge, and the other for in-ears.
SCENE STORE
Here are some useful tips for Scene Storing:
1. To speed up the Scene Store process, disable the STORE CONFIRMATION in the PREFERENCE 1 page of the UTILITY menu.
2. To speed up the Scene Store process even more, enable AUTO STORE in the same Preference page. This means a scene can quickly be stored just by double-clicking the STORE switch on the console. This is useful when updating scenes many times.
3. When storing a Scene, the PATCH and HA LIBRARY data are also stored automatically if a change has been made. In the SCENE STORE window (which appears when the SCENE STORE switch is pressed), there is a choice to OVERWRITE the current libraries (useful when only one PATCH and HA setting is needed for a whole show), or to make NEW libraries (useful when different settings are needed for each Scene in the show).
NOTE: Input Channel names are stored in the INPUT PATCH Library, with Input Patch, Direct Out Patch and Input Channel Insert Patch data.
DCA names are stored in the SCENE Memories.
+48V and GAIN (for PM5D-RH) are stored in the HA library, with settings from remote AD824 and AD8HR input units.
Import Scenes from PCMCIA Card
This is a useful tip for engineers at a festival, to take just one scene from a memory card and load it into the console without overwriting existing data:
1. If the scenes were originally stored to the card using ADVANCED MODE, then they can be loaded into the console also using ADVANCED MODE. When ADVANCED MODE is used, the Scene numbers can be changed, to make sure they don’t overwrite anything already in the console. The same can be done for PATCH and HA Libraries.
2. If the data was stored in BASIC MODE (the default method), then PM5D EDITOR and STUDIO MANAGER software will be needed. Use the following steps:
3. Load the .PM5 file into PM5D EDITOR (select CONSOLE FILE as the file type when browsing in the OPEN SESSION window).
4. Open the Scene Memory window (press Ctrl+Alt+3).
5. Drag the required scene from the right column to the desired number in the left column, and click SAVE AS…
6. Save this scene as a Console File (.PM5) onto the PCMCIA card.
7. Repeat steps 5 and 6 for the relevant PATCH and HA libraries in the LIBRARY window (Ctrl+4) if they are also needed. Then there will be one file for the scene and one for each library on the card.
8. Put the card into the console, select the SCENE MEMORY File that was just saved, and select ADVANCED MODE on the LOAD page in the UTILITY menu.
9. Choose the correct scene as the SOURCE (remember to adjust the ‘from’ and ‘to’ numbers so that other scenes are not overwritten), and choose a free space as the DESTINATION. Then LOAD the file into the console.
10. Repeat steps 8 and 9 for loading the PATCH and HA library files if required.
11. Check the correct libraries are linked to the imported scene in the SCENE page of the SCENE menu.
Initialize Memories
To erase all the memories in the console and return it to its initial settings, first switch off the console. Then switch it on again while holding the SCENE STORE switch. An INITIALIZE MENU will then appear. Choose INITIALIZE ALL MEMORIES to erase all the libraries and return to the default settings. INITIALIZE CURRENT MEMORIES will return the console to the default settings without erasing the libraries.
Monday, March 24, 2008
Copy the Libraries to the console (PM5D)
We copied a few Scenes to the console.
Scene memory on M7CL and LS9 has all mixing and patch information in it and you don't need any extra operation, basically.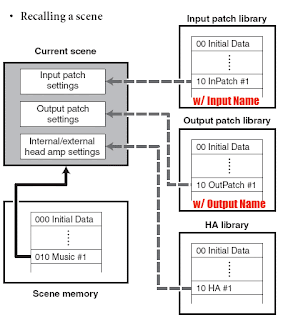 But PM5D has some separate Libraries linked to the Scene and you need to copy these Libraries with the Scene to the console to obtain a right Scene setup.
Scene has mixing parameters but patch, HA, or channel name information. (PM5DV2 Owner's Manual p.87) These parameters are stored in Input Patch Library, Output Patch Library, or HA library and they need to be copied to the console, too.
 Let's use the same technique to copy the libraries to the console. Then, redo the link assignment between the Scene and the Libraries.
Note:
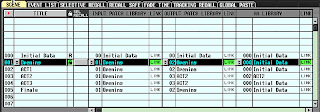
Every Scene has link information for each Input Patch, Output Patch, and HA Library. In the sample screen shot, the Scene 003 is linked to the Input Patch 01, the Output Patch 03, and the HA Patch 002. When you copy a Scene from Studio Manager to the console, the Scene only remember the number in the Libraries.
For example, the console has different Scenes and Input Patch 01 "Not for the ACT2". When Scene 003 "ACT2" is copied from the Studio Manager, the console already has Input Patch 01 and it will be linked to the Scene 003 "ACT2" automatically. You will need to copy the Input Patch 01 "Opening" from the Studio Manager to an empty Library memory of the console, let's say Input Patch Library 04, and change the link of the Scene 003 "ACT2" to the Input Patch 04 "Opening" manually.
This operation can be done by the Studio Manager (online) or on the console.
Scene memory on M7CL and LS9 has all mixing and patch information in it and you don't need any extra operation, basically.
 But PM5D has some separate Libraries linked to the Scene and you need to copy these Libraries with the Scene to the console to obtain a right Scene setup.
Scene has mixing parameters but patch, HA, or channel name information. (PM5DV2 Owner's Manual p.87) These parameters are stored in Input Patch Library, Output Patch Library, or HA library and they need to be copied to the console, too.
 Let's use the same technique to copy the libraries to the console. Then, redo the link assignment between the Scene and the Libraries.
Note:
Every Scene has link information for each Input Patch, Output Patch, and HA Library. In the sample screen shot, the Scene 003 is linked to the Input Patch 01, the Output Patch 03, and the HA Patch 002. When you copy a Scene from Studio Manager to the console, the Scene only remember the number in the Libraries.
For example, the console has different Scenes and Input Patch 01 "Not for the ACT2". When Scene 003 "ACT2" is copied from the Studio Manager, the console already has Input Patch 01 and it will be linked to the Scene 003 "ACT2" automatically. You will need to copy the Input Patch 01 "Opening" from the Studio Manager to an empty Library memory of the console, let's say Input Patch Library 04, and change the link of the Scene 003 "ACT2" to the Input Patch 04 "Opening" manually.
This operation can be done by the Studio Manager (online) or on the console.
Thursday, March 20, 2008
Copy only selected Scene(s) to the console
Scene Management is a most popular question in our classes.
Note:
When you save a file from a console, BASIC ALL type file will be created in default. It always overwrite every parameter on the console when you load it.
A guest engineer brought his ALL file. How can I copy only one Scene from the file to the running console?
(The following instruction is for M7CL, but all of our consoles which uses Studio Manger V2 have same capability.)
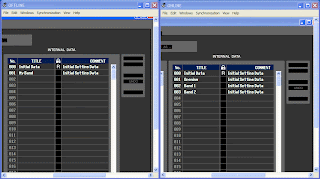
 -- Open two M7CL editor --
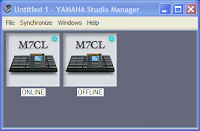
1. Open Studio manager V2.
2. Add two M7CL to the work space and name them as "ONLINE" and "OFFLINE". (Press [F2] to edit the name.)
 -- 1st editor is online with the console --
3. Open ONLINE editor and setup connection to the console to make it online.
4. Re-synchronize it to the console with "Console > PC" option.
5. Open Scene window. You should see all Scenes on the console in the screen.
Now every change you make on the ONLINE editor will be affected to the running console.
 -- 2nd editor is offline. Open the file with it --
6. Open OFFLINE editor. It doesn't need any port setup and will stay offline with the console.
7. Open the file on the OFFLINE editor and open Scene window.
 -- Drag and drop between them --
8. Put those two editor windows next to each other.
9. In OFFLINE editor, select a scene(s) you need to copy to the console. [Ctrl] and/or [Shift] can be used to select two or more scenes.
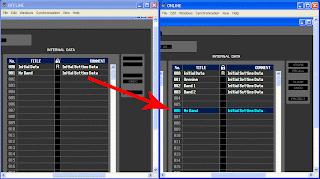 10. Drag it (them) to the ONLINE editor window and drop on the empty scene memory.
11. Only the selected Scene information will be copied to the console without overwriting other data.
Note:
This technique can be used for Library, too.
Note 2:
For PM5D users, please copy linked Libraries with the Scene.
Note:
When you save a file from a console, BASIC ALL type file will be created in default. It always overwrite every parameter on the console when you load it.
A guest engineer brought his ALL file. How can I copy only one Scene from the file to the running console?
(The following instruction is for M7CL, but all of our consoles which uses Studio Manger V2 have same capability.)
 -- Open two M7CL editor --
1. Open Studio manager V2.
2. Add two M7CL to the work space and name them as "ONLINE" and "OFFLINE". (Press [F2] to edit the name.)
 -- 1st editor is online with the console --
3. Open ONLINE editor and setup connection to the console to make it online.
4. Re-synchronize it to the console with "Console > PC" option.
5. Open Scene window. You should see all Scenes on the console in the screen.
Now every change you make on the ONLINE editor will be affected to the running console.
 -- 2nd editor is offline. Open the file with it --
6. Open OFFLINE editor. It doesn't need any port setup and will stay offline with the console.
7. Open the file on the OFFLINE editor and open Scene window.
 -- Drag and drop between them --
8. Put those two editor windows next to each other.
9. In OFFLINE editor, select a scene(s) you need to copy to the console. [Ctrl] and/or [Shift] can be used to select two or more scenes.
 10. Drag it (them) to the ONLINE editor window and drop on the empty scene memory.
11. Only the selected Scene information will be copied to the console without overwriting other data.
Note:
This technique can be used for Library, too.
Note 2:
For PM5D users, please copy linked Libraries with the Scene.
Wednesday, March 19, 2008
Input delay for M7CL/LS9?
This is the first tip/FAQ.
Unfortunately, there's no delay processor on the input channel. So basically you need to insert something to the channel.
You can use an internal rack unit with Mono-Delay program to insert to the channel. But here is a trick.
Do you have a MY-slot you are not using?
Those consoles have 0-600msec Output Port Delay for all output ports including all of MY-slots. Install MY16-AT (or other digital card) and create a loop from its OUT to IN. Insert the port of the looped MY-slot to have its output Port Delay for the input channel. Please remember to turn the Insert ON.
To change the delay time, please go to Output Port Setup screen.
Now, you have 16 delay units ready to be inserted to any input or output channel.
Note
With this insert patch and the external loop, the channel will have little extra delay (much less than 1 msec). Even you set the delay to 0 msec, the channel is delayed by several samples compare to the other channels which don't have the insertion.
Tech tips
I'd like to start writing about several tips of our products which are spoken in our class.
To remember those useful tips, please come back to this blog and find them.
To remember those useful tips, please come back to this blog and find them.
Thursday, March 6, 2008
Subscribe to:
Posts (Atom)